Table of Contents
You have a great video clip ready to go. The last thing you want is to get stuck fumbling through Instagram's menus just to post it. You need it live, and you need it to look good—fast.
This guide skips the fluff and gives you a repeatable workflow for adding video to your Instagram Story. Success means posting a polished, engaging video in minutes, not hours.
We'll cover the essential methods for posting your video:
- A quick checklist for a perfect post every time.
- Step-by-step instructions for recording live or uploading pre-made clips.
- An automated workflow to create professional, captioned videos without manual editing.
- Common mistakes to avoid so your videos always look sharp.
By the end, you'll know exactly how to add a video to an Instagram Story that grabs attention and gets your message across.
Instagram Story Video Checklist
Use this checklist to make sure every video you post is set up for success.
- Video is vertical (9:16 aspect ratio).
- Video is under 60 seconds (or ready to be split).
- Key message is in the first 15 seconds.
- Captions or text overlays are added for sound-off viewing.
- An interactive sticker (Poll, Quiz, Q&A) is included to boost engagement.
How to Add a Video to Your Instagram Story: 2 Core Methods
There are two primary ways to get a video onto your Story: recording it live in the app or uploading a finished clip from your phone's gallery. Your choice depends on whether you need spontaneous, in-the-moment content or a more polished, pre-planned video.
Let's walk through the steps for each.

Method 1: Record a Video Directly in the Instagram App
Recording directly in the app is the fastest way to share authentic, timely updates. This is perfect for behind-the-scenes content, quick announcements, or reacting to events as they unfold.
- Open the Story Camera: From your Instagram feed, swipe right or tap the
+icon and select "Story." - Record Your Video: Press and hold the white shutter button to record.
- Use Hands-Free Mode (Optional): For longer clips where you need your hands, swipe left on the mode selector at the bottom to "Hands-Free." Tap the record button once to start and again to stop.
- Add Effects & Post: Use stickers, text, or filters, then tap "Your Story" to publish.
Method 2: Upload a Video from Your Camera Roll
Uploading a pre-made video is the standard for marketers sharing branded content, creators repurposing clips from longer videos, or anyone who has already edited a video outside of Instagram.
- Open Your Gallery: From the Story camera, swipe up or tap the gallery icon in the bottom-left corner.
- Select Your Video: Tap the video you want to upload. If it's longer than 60 seconds, Instagram will automatically split it into consecutive clips.
- Select Multiple Clips (Optional): To create a sequence, tap the "Select" icon at the top right of the gallery. Choose your videos in the order you want them to appear.
- Edit & Post: Adjust each clip as needed, then tap "Next" and share to "Your Story."
While these native methods are simple, creating consistently high-quality, branded videos requires a more efficient system—especially if you're short on time.
A Faster Way: Create Polished Instagram Story Videos on Autopilot
Manually editing every video for Instagram Stories—trimming, cropping for vertical, and adding captions—is a massive time-sink. For busy creators and marketers, this repetitive work is a bottleneck. The solution is to automate the tedious parts so you can focus on strategy, not editing.
This is where a smarter workflow makes all the difference.
From Raw Content to Polished Story in Minutes with Flowjin
The most efficient way to create professional Story videos is with an AI-powered tool. Flowjin is an AI video repurposing tool for busy creators and marketers that turns long-form audio or video into social-ready clips with animated captions and branding.
It gives you a repeatable system for creating high-quality content.
Option A: You already have a short video clip.
If you have a testimonial, a product demo, or a quick highlight, upload it to Flowjin to instantly add dynamic, word-by-word captions and your brand kit (logo and colors). This makes your video more engaging and accessible for sound-off viewers.
Option B: You have long-form content (podcast, webinar, interview).
This is where you can save the most time. Instead of manually searching for highlights, upload your long video or audio file to Flowjin.
- Upload Your Content: Add a link to your YouTube video, or upload a video/audio file.
- Let AI Find the Best Clips: Flowjin's AI analyzes the transcript and identifies the most compelling, shareable moments. It serves them up as ready-to-use short video clips.
- Customize & Export: Quickly review the clips, make any minor edits to the captions or design, and export them. The AI automatically reframes horizontal video to vertical and applies your branding.
This automated workflow transforms a single one-hour webinar into a month's worth of Instagram Story content without you ever opening a traditional video editor. For a deeper look at video editing workflows, check out our guide on how to edit videos for Instagram in 2024.
How to Make Your Story Video More Engaging
Uploading your video is just the start. To stop people from swiping past, you need to turn your clip into an interactive experience using Instagram's native features.
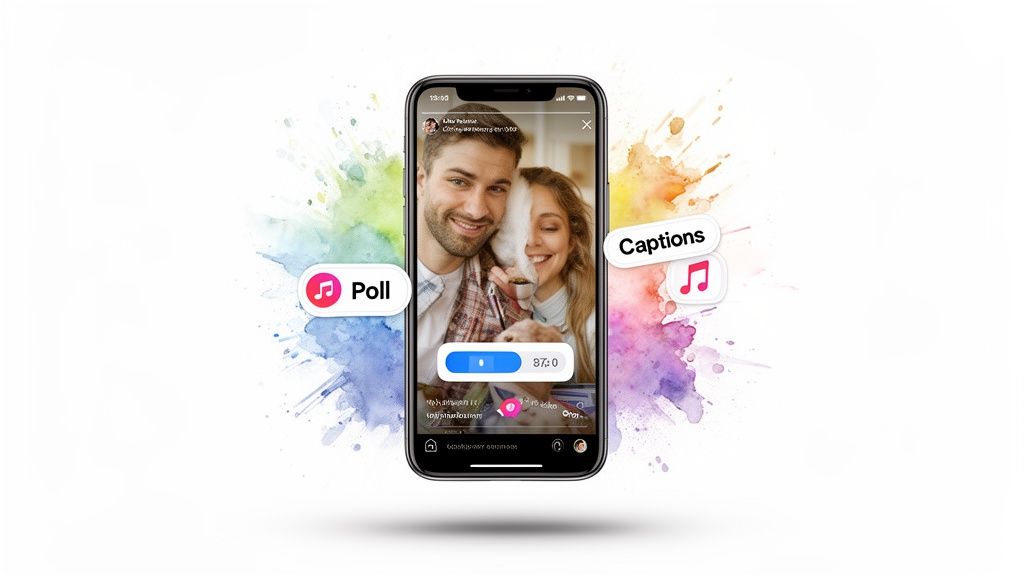
Use Interactive Stickers to Spark Conversation
Stickers are the easiest way to boost engagement. They give your audience a simple way to respond, providing you with instant feedback and signaling to the algorithm that your content is valuable.
- Polls: Ask a simple "this or that" question related to your video. (e.g., "Love this new feature? Yes/No").
- Quizzes: Test your audience's knowledge with a multiple-choice question about your video's topic.
- Q&A: Invite followers to "Ask me anything" about what they just watched to start conversations in your DMs.
Don't just post a video; give viewers a reason to tap, vote, or ask a question. For more ideas, you can steal these 3 ideas to make short videos and apply them to your Stories.
Add Text and Captions for Sound-Off Viewers
Assume your audience is watching with the sound off. If your message relies on audio, it will be lost on a huge portion of viewers.
Adding captions or text overlays is non-negotiable. It ensures your message is understood, even in silence. This is particularly important because, according to insights on Instagram statistics from Meltwater, video is the top-performing format on Stories. Making your videos accessible with captions maximizes their reach and impact.
3 Common Mistakes to Avoid When Adding Videos to Stories
A few simple mistakes can make your content look unprofessional and undermine all your hard work. Here’s how to avoid the most common ones.

1. Uploading Horizontal Video
- The Mistake: Instagram Stories are designed for a vertical 9:16 aspect ratio. Uploading a horizontal (16:9) video results in awkward, unprofessional-looking black bars at the top and bottom.
- The Fix: Always shoot video vertically. If repurposing a horizontal video (like a YouTube clip), use a tool like Flowjin to automatically reframe it. The AI keeps the speaker centered in the new vertical format so nothing important is lost. You can learn more about repurposing here: how to get clips from YouTube videos.
2. Forgetting Captions
- The Mistake: A huge portion of users watch Stories with the sound off. Without captions, your message is completely lost if it relies on audio.
- The Fix: Always add captions. Instagram’s auto-caption sticker is a good start, but for more dynamic, accurate, and on-brand captions, use a tool that specializes in it. Understanding the importance of closed captioning is key for accessibility and viewer retention.
3. Uploading a Low-Quality File
- The Mistake: A blurry or pixelated video makes your brand look amateur. This is usually caused by Instagram's compression or uploading a low-resolution file.
- The Fix: Always export your final video in at least 1080p resolution. Upload over a stable Wi-Fi connection, not mobile data, to minimize compression issues.
Your Instagram Story Video Questions Answered
Here are quick answers to the most common questions about adding videos to your Instagram Story.
How Long Can a Video Be on an Instagram Story?
Each individual Story clip can be up to 60 seconds long. If you upload a longer video, Instagram automatically splits it into 60-second segments. However, viewer attention drops off fast, so aim to deliver your key message within the first 15 seconds.
Can I Add Popular Music to My Business Story?
It depends on your account type.
- Personal Accounts have access to Instagram's full library of popular music.
- Business Accounts are restricted to a library of royalty-free music to avoid copyright infringement for commercial use.
Why Does My Story Video Look Blurry?
Blurriness is usually caused by Instagram's compression. To fix this, start with a high-quality file (1080p resolution or higher) and upload over a strong Wi-Fi connection. Avoid sending the video file through messaging apps like WhatsApp before uploading, as they also compress and degrade quality.
How Do I Add a Clickable Link to My Video?
Anyone can add a clickable link using the "Link" sticker. After adding your video to the Story editor, tap the sticker icon, select the "Link" sticker, and paste your URL. Customize the sticker text with a clear call-to-action like "Read the Full Post" or "Shop Now" to encourage clicks.
Ready to stop wasting time on manual video editing? With Flowjin, you can turn long-form podcasts and webinars into dozens of high-quality, branded video clips for your Instagram Stories in minutes. See how Flowjin can transform your content workflow.